springmvc配置

1、springmvc路径跳转配置

目录结构
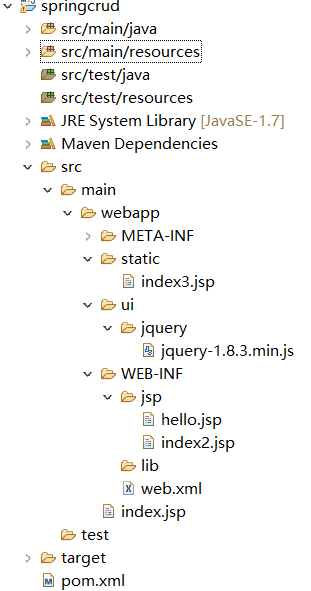
控制层

1
2
3
4
5
6
7
8
9
10
11
12
13
14
15
16
17
18
19
20
21

<!-- 使用注解开发,不用配置controller,需要配置一个组件扫描器 -->
<context:component-scan base-package="com.*" />

<!-- 视图解析器 -->
<bean
class="org.springframework.web.servlet.view.InternalResourceViewResolver">
<!-- 配置从项目根目录到指定目录一端路径 ,建议指定浅一点的目录 -->
<property name="prefix" value="/WEB-INF/jsp/"></property>
<!-- 文件的后缀名 -->
<property name="suffix" value=".jsp"></property>
</bean>

<!--将index2.jsp放在/WEB-INF/jsp/目录下,请求index2时不经过controller处理;
配置了mvc:view-controller后需要配置mvc:annotation-driven,不然走controller的请求会失效 -->
<mvc:view-controller path="/index2"
view-name="index2" />
<mvc:annotation-driven></mvc:annotation-driven>

<!--处理静态资源 -->
<mvc:default-servlet-handler/>

index.jsp

1
2
3
4
5
6
7
8
9
10
11
12
13
14
15
16
17
18
19
20
21
22
23
24
25
26
27
28
29
30
31
32
33
34
35
36
37
38

<%@ page language="java" contentType="text/html; charset=ISO-8859-1"
pageEncoding="ISO-8859-1"%>
<%@ taglib uri="http://java.sun.com/jstl/core_rt" prefix="c"%>
<!DOCTYPE html>
<html>
<head>
<meta charset="ISO-8859-1">
<title>Insert title here</title>
<%

request.setAttribute("path", request.getContextPath());
%>
</head>
<body>

//走controller跳转
<a href="hello">go controller</a>
<br>

//不走controller跳转,在springmvc配置文件中配置了mvc-view;index2.jsp页面需放在/WEB-INF/jsp/目录下
<a href="index2">not go controller</a>
<br/>

//加载静态资源
<a href="${path}/static/index3.jsp">load static resource index3.jsp</a>

//加载静态资源,需在springmvc配置文件中配置mvc:default-servlet-handler
<script type="text/javascript"
src="${path}/ui/jquery/jquery-1.8.3.min.js"></script>

<script type="text/javascript">
$(function() {
console.log("${path}")
})
</script>
</body>
</html>

2、springmvc获取请求参数,封装数据到请求域

前台

1
2
3
4
5
6


<form action='testParam' method='get'>
用户名:<input type='text' name='username'>
<button>提交</button>
</form>

控制层

处理方式一:
方法参数为Map或者ModelMap类型,数据封装到Map或者Modelmap类型中,其实就是将数据放入到请求域当中

1
2
3
4
5
6
7
8
9
10
11
12


@RequestMapping("/testParam")
public String testParam(ModelMap modelMap,HttpServletRequest request) {
String username = request.getParameter("username");
System.out.println("接收前台发送过来的请求参数=========>用户名:"+username);

//modelmap会将数据放到请求域当中
modelMap.put("address", "haikou");
//返回视图
return "hello";
}

处理方式二:
用ModelAndView作为返回值,可以将数据放到请求域中且指定返回的视图

1
2
3
4
5
6
7
8
9
10
11

@RequestMapping("/testParam")
public ModelAndView testParam(HttpServletRequest request) {
String username = request.getParameter("username");
System.out.println("接收前台发送过来的请求参数=========>用户名:"+username);

//参数为返回的视图
ModelAndView hello =new ModelAndView("hello");
hello.addObject("address", "haikou");
return hello;
}

前台获取

1
2
3
4

<!-- 获取后台封装在请求域中的数据 -->
地址:${requestScope.address}<br/>
<%=request.getAttribute("address")%>

3、springmvc处理文件上传

springmvc.xml增加如下配置

1
2
3
4
5
6
7

<!--文件上传 -->
<bean name="multipartResolver"
class="org.springframework.web.multipart.commons.CommonsMultipartResolver">
<property name="defaultEncoding" value="UTF-8"></property>
<property name="maxUploadSize" value="10240000"></property>
</bean>

前台表单提交

1
2
3
4
5
6

//必须是post请求,且enctype='multipart/form-data'
<form action='testFileUpload' method='post' enctype='multipart/form-data'>
文件:<input type='file' name='file' ><br/>
<button>提交</button>
</form>

控制层

1
2
3
4
5
6
7
8
9
10

@RequestMapping("/testFileUpload")
public String testFileUpload(@RequestParam("file")MultipartFile file) throws IOException {
//获取文件名
String fileName=file.getOriginalFilename();
//获取流,即可取得内容
InputStream in=file.getInputStream();
System.out.println("文件名===========>"+fileName);
return "hello";
}

4、springmvc返回json数据

pom.xml加入依赖

1
2
3
4
5
6
7
8
9
10
11
12
13
14
15
16
17
18
19

<!-- https://mvnrepository.com/artifact/com.fasterxml.jackson.core/jackson-databind -->
<dependency>
<groupId>com.fasterxml.jackson.core</groupId>
<artifactId>jackson-databind</artifactId>
<version>2.9.6</version>
</dependency>
<!-- https://mvnrepository.com/artifact/com.fasterxml.jackson.core/jackson-core -->
<dependency>
<groupId>com.fasterxml.jackson.core</groupId>
<artifactId>jackson-core</artifactId>
<version>2.9.6</version>
</dependency>
<!-- https://mvnrepository.com/artifact/com.fasterxml.jackson.core/jackson-annotations -->
<dependency>
<groupId>com.fasterxml.jackson.core</groupId>
<artifactId>jackson-annotations</artifactId>
<version>2.9.6</version>
</dependency>

控制层

1
2
3
4
5
6
7
8
9
10

//需要加@ResponseBody注解
@RequestMapping("/testJson")
@ResponseBody
public Map testFileUpload() {
Map<String, Object> map=new HashMap<>();
map.put("username", "沈利兵");
map.put("sex", "男");
return map;
}